Building an Image Converter with Next.js Server Actions
This article explains how to build a simple but powerful image converter using Next.js. The application allows users to upload images, convert them to different formats (such as AVIF, WEBP, and PNG), and download the results.
Project Overview
The image converter is a web application where users can:
- Drag and drop or select multiple image files.
- See a preview of the selected images.
- Choose the output format for the conversion.
- Start the conversion process and see the progress.
- Download the converted images individually or as a zip file.
The main motivation behind this project was to create a fast and easy-to-use tool for optimizing images for the web. As a web developer, I often need to convert images to modern, efficient formats like WebP or AVIF to improve website performance. This tool streamlines that process.
Core Technologies
This project is built on a selection of modern web technologies, chosen for their performance and developer experience:
- Next.js: As a full-stack React framework, Next.js provides server-side rendering, API routes, and, most importantly for this project, Server Actions. This allows for a seamless integration of the frontend and backend in a single codebase.
- TypeScript: Using TypeScript ensures type safety, which is crucial for a project that handles complex data structures like
File objects and FormData. It helps catch errors early and makes the code more robust and maintainable.
- Tailwind CSS: For styling, Tailwind CSS offers a utility-first approach that enables rapid development of a clean and responsive user interface without writing custom CSS.
- Sharp: This high-performance Node.js image processing library is the core of the image converter. It's incredibly fast and supports a wide range of image formats, making it the perfect choice for this project.
The Conversion Process
The image conversion is handled by a Next.js server action. Here’s a high-level overview of the process:
- File Upload: The user uploads one or more images through the browser.
- Server Action: The files are sent to a server action.
- Image Processing: The server action uses the
sharp library to convert each image to the desired format in memory.
- Download: The converted files are sent back to the client to be downloaded.
Here is a snippet of the server action responsible for the conversion:
import sharp from "sharp";
const SHARP_FORMAT_MAP = {
JPEG: (instance: sharp.Sharp) => instance.jpeg({ quality: 80 }),
PNG: (instance: sharp.Sharp) => instance.png(),
WebP: (instance: sharp.Sharp) => instance.webp({ quality: 80 }),
AVIF: (instance: sharp.Sharp) => instance.avif({ quality: 80 }),
};
async function convertImage(
buffer: Buffer,
format: keyof typeof SHARP_FORMAT_MAP
) {
const sharpInstance = sharp(buffer);
const transformer = SHARP_FORMAT_MAP[format];
if (!transformer) {
throw new Error(`Unsupported format: ${format}`);
}
return transformer(sharpInstance).toBuffer();
}
This approach uses a map to associate each output format with a specific Sharp transformation. This makes the code clean, extensible, and easy to maintain when adding new formats.
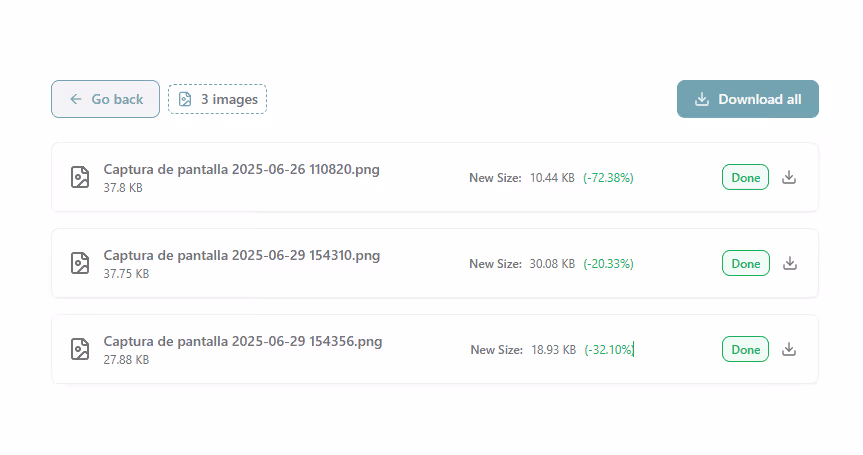
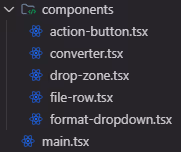
User Interface
The UI is built with React and Tailwind CSS, focusing on a clean and intuitive user experience. Key components include:
- Drop Zone: For easy file selection.
- File List: To display the selected images and their conversion status.
- Format Selector: A dropdown to choose the output format.
- Action Buttons: To start the conversion and download the files.
The DropZone Component
The DropZone component, built with the react-dropzone library, provides a simple way for users to select their images. It supports both drag-and-drop and the traditional file explorer.
export const DropZone = ({ setFiles }) => {
const onDrop = useCallback((acceptedFiles: File[]) => {
}, [setFiles]);
const { getRootProps, getInputProps, isDragActive } = useDropzone({ onDrop });
return (
<div {...getRootProps()}>
<input {...getInputProps()} />
<p>
{isDragActive
? "Drop the files here..."
: "Drag and drop your images here or click to select"}
</p>
</div>
);
};
The FileRow Component
Once files are selected, the FileRow component is responsible for displaying each file's information, including its name, size, and the controls for conversion. It also shows the conversion status and provides a download button for each successfully converted file.
export const FileRow = ({ file, format, setFormat, onRemove, convertedFile, status }) => {
return (
<div className="file-row">
<span>{file.name}</span>
{status === "converted" && convertedFile && (
<button onClick={handleDownload}>Download</button>
)}
{/* ... other controls ... */}
</div>
);
};
The Converter Component
The Converter component is the main component that orchestrates the entire process. It manages the state of the files, handles the conversion logic, and renders the other UI components.
export const Converter = ({ files, setFiles }) => {
const [convertions, setConvertions] = useState([]);
const handleConvert = async () => {
};
return (
<div>
{/* ... UI for global actions ... */}
{convertions.map((convertion, index) => (
<FileRow key={index} {...convertion} />
))}
</div>
);
};
The UI is designed to be responsive and works well on both desktop and mobile devices.
Conclusion
This project is a great example of how to use Next.js server actions to build a full-stack feature. It combines a modern frontend with a powerful backend to create a useful tool for image conversion.
Feel free to try out the image converter and explore the source code to learn more about the implementation.


